Preview Only
This is a preview of "Your First App: Node.js". If you’d like to purchase a full copy, please visit https://gumroad.com/jimschubert.
1. Introduction
If you want to learn how to write a quality application using Node.js and various related tools, you’re looking at the right book. This book aims to be a complete introduction to writing a fully functional application using Node.js. It is not meant to be an in-depth romp through JavaScript or Node.js internals. If that’s the type of book you’re looking for, then this is the wrong book.
You’ll find numerous books on the subject of Node.js, but few (if any) provide start-to-finish details regarding true application concerns. For example, you may find a book about writing a Node.js application with MongoDB or a book about a Node.js application using Backbone.js, but these books only focus on a narrow subset of the application lifecycle. Rather than being another 200-page blog article compiled into book format, this book aims to get you on your way in the application life cycle within a very specific technology stack. In other words, knowing how to write code using a specific technology is only part of the real-world concerns of creating and maintaining an application. This book attempts to address some of these real-world concerns that are commonly left out of other similar texts.
|
Because of the nature of this book, focusing on the process of writing a Node.js application, there will be many times where you’ll need filler information. Just as you would in a professional environment, you’ll need to research any missing content. I’ll do my best explain the basics, then point you to helpful resources for further reading. |
1.1. Who this book is for
This book is intended for professionals or students who have a comfortable working knowledge of JavaScript, HTML, CSS, and the stateless nature of HTTP. If you’re not comfortable with JavaScript, I highly recommend reading both JavaScript: The Definitive Guide and JavaScript Garden. Although I’ll quickly go over some necessary fundamentals for beginners, it will be difficult to become a Node.js developer without a solid foundation in JavaScript. HTML, CSS, and client-side JavaScript will be necessary for the presentation of your application, while understanding the stateless nature of HTTP will make some of the techniques discussed in this book easier to learn.
I like to believe that developers who pick up a book like this tend to learn well from examples and hands-on coding. I’m writing this book for people like me. I make a few assumptions about your comfort level since this book is written for new and experienced software engineers. With that in mind, if an example says something like download Twitter Bootstrap, I assume you know how to do this (or can figure it out) and I won’t write out the steps. You’re here for content and experience and that’s what I’ll give you.
1.2. Examples
Many examples throughout this book are available as companion code. The code can be downloaded from the github repository: jimschubert/yfa-nodejs-code.[1]
To obtain a copy of the example code, you can click the Download ZIP link on the repository’s page. Or, if you already have git installed, you can clone the repository.
$ mkdir ~/samples && cd ~/samples
$ git clone git@github.com:jimschubert/yfa-nodejs-code.git
$ cd yfa-nodejs-code
If you don’t already have git installed, go to http://git-scm.com/ and follow installation instructions. You’ll need git in future chapters, so it doesn’t hurt to install it now.
1.3. Code
Code examples in the book will resemble the following example.
var Animal = function Animal() {
    this.species = null;
    this.immortal = false;
    this.move = null;
    this.sound = null;
}
The above code is inline, meaning it is code that is neither intended to be a self-contained executable example nor is it part of a larger executable example.
In instances where code requires special attention, or requires a callout to an order of operations, numbered callouts will be used.
$ cat > a.txt <<EOF
> This is an
> exmaple of        (1)
> a heredoc
> EOF
$ wc -l < a.txt     (2)
3| 1 | Be careful with spelling in heredocs |
| 2 | A heredoc’s last line (EOF) isn’t written to the file |
Some code will be available in the accompanying source code. This code will display the path to the code, relative to the top-level directory of the companion code’s repository:
#!/usr/bin/env ruby
puts "What is your name?"
name = gets

puts "Hello #{name.chomp}!"
After you’ve cloned companion code repository, you can run most of this code directly from the root of the project:
ruby code/basics/beginner.rb1.4. Terminal
There will be many instances in this text where you’ll need to type some
commands into a terminal. My terminal’s shell is Bash 4.2.45, so all
commands should execute perfectly fine in all Bash 4.x environments. For
short commands, I may ask you via inline text to "execute ls -la in
your terminal". For longer examples, the executable code will be
preceded by a $ symbol to indicate the bash shell. Standard output and
standard error will be displayed in this text just as it would be
displayed in your terminal. For example, rather than ask you to
"execute grunt --help in a terminal" I may display the entire
command and output:
$ grunt –help grunt-cli: The grunt
command line interface. (v0.1.9)

If you're seeing this message, either a Gruntfile wasn't found or grunt
hasn't been installed locally to your project. For more information about
installing and configuring grunt, please see the Getting Started guide:

http://gruntjs.com/getting-started
When you need to execute server-side JavaScript code directly, after
installing Node.js you can run node directly from the command line.
You’ll be dropped into a REPL, which stands for Read-Eval-Print-Loop
and is a fancy acronym for an interactive shell. In a node REPL, you
can execute code and get immediate feedback. A REPL isn’t a special
Node.js concept, Ruby has irb, Scala has its own REPL, even C# has a
REPL if you use Mono.
1.5. Sidebars
A variety of boxes will be used throughout the book to present ideas or concepts. These are explained here, although the differences may be subtle.
|
Note. This is a short side comment which would break the flow of surrounding text. |
|
Tip. Not exactly trade secrets, but helpful to remember or to investigate further. |
|
Important. Similar to a note. Try not to skip these! |
|
Caution. Common things to be aware of which may have unexpected or undesirable outcomes. |
|
Warning. A little more intense than "Caution"; consider warnings as you would security concerns. |
|
|
Git Workflow
This presents comments and executable commands for working with git. Commit: |
1.6. Installing Node.js
This book is written against a slightly older version of Node.js. I’ll provide some context in the following paragraphs. If you’re familiar with verion managers, or you’d just like to skip to the meat of the book, you can jump the explanation and go straight to the installation instructions.
1.6.1. Background
The first edition of this book simply asked readers to "install Node.js" and pointed to nodejs.org. I didn’t see this as a problem at the time because Node.js has been pretty good about being backward compatible. Don’t worry, it’s still backward compatible in that you can write the same JavaScript code today as you could 3 or 4 years ago.
In 2015, a couple years after I began writing the first edition of this book, Node.js decided to integrate the excellent work of a Node.js fork called io.js. The problem was that Node.js was on version 0.12 while io.js was version 3.0, so the Node.js Foundation had to resolve version differences for both communities. The result: Node.js 4.0 was the release following Node.js 0.12.[2]
I was conflicted for a while in regards to how I’d account for these version differences. The aim of this book is to walk you as a reader through the entire development process, gaining skills that I feel are often overlooked in tutorials or even in higher education. On the other hand, a reader will be less likely to read a book targeting Node.js 0.12 when the current stable version (as of June 2017) is v6.11.0 LTS. Right?
Technology is ever changing. I contributed a bug fix in the beginning of 2013 to Node.js which landed in version 0.9.10, and by the time I had finished writing the first edition of this book on Leanpub we were on version 0.12. By September 2015, we were at v4.0.0. By March 2016, we were on v4.4.0. These quick releases may appear to indicate that applications written in older versions of the library are outdated. This isn’t necessarily the case. Many of the commits which warrant a bump in versions are related to documentation and tooling. There are plenty of bugfixes and performance improvements as well. After v4.0.0, there has been a lot of effort to support ES6 and ES7 language features. Few of these changes, if any, will have any impact to the techniques you’ll learn in this book.
There are times that Node.js APIs will change, and these are referred to as "breaking changes". As an example, a breaking change in Node.js v4.0.0 makes ChildProcess.prototype.send() execute asynchronously across all platforms. If you were to naively upgrade from v0.12 to v4.0.0, you may experence numerous issues if you haven’t read through the breaking changes (don’t worry, we’ll cover a similar scenario later in the book). This was my conundrum; upgrading to the newest version of Node.js would be no small feat as the changelog between these versions is enormous.
I decided to use nvm, a node version manager utility, to reduce any confusion or complexity for current and future readers. This will solve almost all problems, excluding unforeseen silliness.
1.6.2. Instructions
First, install the current stable version of Node.js. This can be downloaded directly from nodejs.org. While there may be other options for installing Node.js on your operating system, these may cause conflicts with the official installers so I don’t recommend them.
When installation completes, you’ll want to verify that the node binary is installed and available on your path:
$ node --version
v6.11.0
Now install nvm. Instructions are taken from nvm’s README:
$ curl -o- https://raw.githubusercontent.com/creationix/nvm/v0.33.2/install.sh | bashReload your shell or execute source ~/.bashrc to consume the necessary changes in your terminal session.
This is the only way to install nvm. If you’re familiar with node and npm, you may attempt to install nvm as a global node module. If you’ve done this, you’ll receive a warning stating "This is not the package you are looking for: please go to http://nvm.sh".
Now, you’re free to install any version of Node.js through nvm and your terminal session will use that version only. This has the added benefit of installing modules and plugins to a sandboxed location for that specific version of node. This means that none of the commands in this text will interfere with your system installation of Node.js if you’re already using it for other projects.
Install Node.js v0.12.0:
$ nvm install 0.12.0
Downloading and installing node v0.12.0...
Downloading https://nodejs.org/dist/v0.12.0/node-v0.12.0-darwin-x64.tar.gz...
######################################################################## 100.0%
Computing checksum with shasum -a 256
Checksums matched!
Now using node v0.12.0 (npm v2.5.1)
Creating default alias: default -> 0.12.0 (-> v0.12.0)
Now check the list of installed Node.js binaries:
$ nvm list
->      v0.12.0
         system
default -> 0.12.0 (-> v0.12.0)
node -> stable (-> v0.12.0) (default)
stable -> 0.12 (-> v0.12.0) (default)
iojs -> iojs- (-> system) (default)
lts/* -> lts/boron (-> N/A)
lts/argon -> v4.8.3 (-> N/A)
lts/boron -> v6.11.0 (-> N/A)
The top arrow (->) indicates the current selected version. You can verify this by executing node --version again. If your terminal supports colors, you’ll notice the last three lines have colored the N/A text in red. This means those binaries are not installed. You can install these either by name or version. For example, I tend to use unstable versions of Node.js, so I don’t have 6.11.0 installed. I can install it either by name:
$ nvm install lts/boron
Downloading and installing node v6.11.0...
Downloading https://nodejs.org/dist/v6.11.0/node-v6.11.0-darwin-x64.tar.gz...
######################################################################## 100.0%
Computing checksum with shasum -a 256
Checksums matched!
Now using node v6.11.0 (npm v3.10.10)
or version number:
$ nvm install 6.11.0
Downloading and installing node v6.11.0...
Local cache found: $NVM_DIR/.cache/bin/node-v6.11.0-darwin-x64/node-v6.11.0-darwin-x64.tar.gz
Checksums match! Using existing downloaded archive $NVM_DIR/.cache/bin/node-v6.11.0-darwin-x64/node-v6.11.0-darwin-x64.tar.gz
Now using node v6.11.0 (npm v3.10.10)
You can switch between versions with nvm use, and because nvm installed bash completions, you can TAB complete your installed versions.
$ nvm use 0.12.0
Now using node v0.12.0 (npm v2.5.1)
To uinstall a version of node’s binaries, you’ll need to nvm use a different version first.
If you want to drop back to the system-installed binaries, you can run nvm unload or nvm deactivate to remove nvm’s orceshtration from your current shell.
I recommend setting your system binary as the default:
$ nvm alias default system
default -> system
Lastly, as you work through this book, you can tell nvm to use v0.12.0 for this project using a .nvmrc file. I realize you may not have a directory or code setup for the book at the moment, but be sure to revisit this section for details. From your project’s root directory:
$ echo "v0.12.0" > .nvmrcNow, when you enter the project’s directory you can run nvm use and it will automatically select the correct version.
That’s a lot of information. Here’s a short terminal session demonstrating the use of nvmrc:
$ mkdir ~/temp/nvmrc
$ cd ~/temp
$ nvm use system
Now using system version of node: v8.0.0 (npm v5.0.1)
$ cd nvmrc
$ echo "v0.12.0" > .nvmrc
$ nvm use
Found '/Users/jim/temp/nvmrc/.nvmrc' with version <v0.12.0>
Now using node v0.12.0 (npm v2.5.1)
$ node --version
v0.12.0
2. Basics
In case you skipped the introduction, let me say again that I highly recommend reading both JavaScript: The Definitive Guide and JavaScript Garden[3].
The goal of this book is not to teach you how to be a JavaScript developer, but I will cover some fundamental concepts just in case you’re trying to hit the ground running.
|
In case you’ve skipped ahead, be sure to install Node.js according to the instructions in the previous chapter. |
2.1. JavaScript Basics
JavaScript is a dynamic language. When JavaScript was born 20 years ago, there were radically different best practices and standards. The language has grown in that time, but there are still some weird things to consider. This section is not meant to be a ‘how to write JavaScript’ introduction; the goal is to call out specific parts of JavaScript that will be beneficial to your understanding of Node.js.
2.1.1. Prototypal
A lot of people with a classical language background seem struggle with JavaScript or Node.js. A classical language is one in which a class can derive from another class. An instantiation of that class chain is called an object. In a classical language, the class constructor(s) or the object itself maintain all behavioral logic of the object. In a prototypal language[4], objects inherit from other objects. This means that an object can contain not only the behaviors of other objects, but essentially derive from another fully constructed object. You might think this sounds complex (or even insane), but prototypal inheritance opens the door for fun features. It also allows for some annoying bugs if implemented improperly. This forces the community to create standards and patterns to help us avoid those bugs. If you’re not familiar with prototypal languages, be sure to read the Wikipedia article[5] on the subject for a basic understanding.
2.1.2. Objects
In JavaScript, pretty much everything is an object. Even literals (e.g.
var x = 100;) are special types of objects. Functions are also special
types of invokable objects.
|
According to MDN, Every function in JavaScript is actually a Function object. Some will argue that all objects are functions because you have to call a constructor function to instantiate most objects. You don’t even have to explicitly call a constructor function. You can verify this in the node REPL when you get a chance: Don’t get hung up on arguments in the JavaScript community or you’ll get nowhere. |
An object in JavaScript is just an associative array (or a map, if you prefer). It is a collection of keys in which each point to a value. This is often forgotten by newer members of the community because of the helpful dot-notation. For example, look at the following object literal which assigns a value to a key in dot notation:
var x = {};
x.someValue = 100;
Now, consider that an object is just a container of key,value pairs. If you wanted to store the result of n2, you may do so like this:
var x = {};
x['n ** 2'] = 4;
Realize, however, that using non-contiguous and non-alphanumeric text for keys can make the usage of your object difficult. For a more detailed explanation of objects in JavaScript, check out MDN: Working with Objects.
2.1.3. Strict equality
JavaScript has the concept of equality (==) and strict equality
(===). The standard equality operator (==) applies some oddly
complex type coercion rules to each side of the equals signs. For
example, look at the following Node.js REPL output:
$ node
> 1 == false
false
> 0 == false
true
> "0" == false
true
> "" == false
true
> "0.0" == false
true
> "false" == false
false
> false == false
true
If you’re not familiar with a REPL environment (REPL stands for
read-eval-print-loop), the first line executes node, and subsequent
lines either begin with a > to indicate user input or no preceding
character to indicate an evaluated result. If you are annoyed by the above results,
check out the following results using strict equality:
> 1 === false
false
> 0 === false
false
> "0" === false
false
> "" === false
false
> "0.0" === false
false
> "false" === false
false
> false === false
true
Better, right?
In short, I recommend always using the strict equality (===) operator
unless you are 100% certain the coerced value is what you intend and
there is a comment in code to indicate this intention.
2.1.4. Scope/Context
I’ve known engineers who would gladly argue all day long about whether scope and context are the same thing. Rather than attempt to define these two somewhat loaded broader terms, I’ll discuss functional scope and execution context.
The JavaScript environment we’ll be using is based on ECMAScript 262, Edition 5. There are newer specifications for more recent additions to the language, but we focus on this version because it’s easier to consume.
When control is transferred to ECMAScript executable code, control is entering an execution context. Active execution contexts logically form a stack. The top execution context on this logical stack is the running execution context. A new execution context is created whenever control is transferred from the executable code associated with the currently running execution context to executable code that is not associated with that execution context. The newly created execution context is pushed onto the stack and becomes the running execution context.
http://bit.ly/18GZ8qk
An execution context maintains three things: variable environment, lexical environment, and the binding to this.
The specification later explains that there is an internal
property called [[Scope]] which refers to the lexical environment of
the execution context. This scope property is defined in Table-9 of
the document:
A lexical environment that defines the environment in which a Function object is executed. Of the standard built-in ECMAScript objects, only Function objects implement
[[Scope]].
http://bit.ly/18GZ8qk
Whenever a function executes, it does so in a certain context. This context defines the variables (functions and objects) it creates internally as well as the variables it has access to externally (as a result of being nested within other functions). Resolution of variables propagates all the way up to the global environment. This is how I define functional scope.
One gotcha is that functions are lexically scoped, meaning this variable resolution order is determined by where a function is declared and not by where a function is invoked. This is the basis for closures; we can define a function which is returned from another function and encapsulate any variables from the enclosing or outer function privately.
When people refer to context, I don’t think they’re talking about execution context as much as they are talking about the value of this in the current execution context. Consider the following example which demonstrates the value of x in different contexts.
var x = 5;

var example = {
    x: 100,

    a: function(){
        var x = 200;
        console.log('a context: %s, var x = %s', this.x, x);
    },

    b: function(){
        var x = 300;
        return function(){
            var x = 400;
            console.log('b context: %s, var x = %s', this.x, x);
        };
    },

    c: function(){
        var other = { x: 500 };
        var execB = this.b().bind(other);
        execB();
        return execB;
    }
}

console.log('example.x: ' + example.x); // 100
example.a();                            // 100
example.b()();                          // undefined
example.a.call({x:9999});               // 9999
var execB = example.c();                // 500
execB.call({x:9999}); // 500|
If you’ve cloned the example code repository, you can execute the above example using the path in the example’s title: |
In this code example, you may be wondering how the context has changed
between functions a, b and c. To demonstrate, I created a variable
x in each lexical environment for a given function. Notice how the
value 5 is never displayed.
In function a, the reference bound to this is the object named
example.
In function b, we indirectly change the bound context by returning a
function from within a function which in turn changes the encapsulating
object (e.g. scope) of the final function. You may expect this resulting
function to print 5, but the x variable is susceptible to the same
rules here as it is in function a: the encapsulating context’s this
is actually bound to the global execution environment (node, in our
case).
When we see a output 9999, we are using the special function .call()
which allows us to manipulate the bound this context. Rather than
relying on the example object as context, we can easily pass in a
literal object with any value we want! Usually, when I say something
is changing context, this is what I’m talking about. There are two
special functions which can change the value of this at the point of
invocation: call() and apply().
Funcion c demonstrates a third way to modify the this
bound context. The interesting thing about this approach to contextual
modification is that bound functions can not have their context
changed at runtime after being bound. On line 21, var execB = this.b().bind(other);,
the .bind(other) protects function b's context from being modified after this line.
You’ll see this in the output if you run the example.
If we attempt to use call() as we did on function a, the context
is not changed at all. This allows us to essentially lock down
function context when working with or creating our own modules.
2.1.5. Constructor Functions
A special case for the scope and context discussion is the use of
constructor functions. A constructor function is a function which
creates an object and, as we saw in the example object above, a new
execution context. The community standard for differentiating
constructor functions from normal functions is to format normal function
names in camel case (likeThis) and constructor functions in pascal/title
case (LikeThis). Unfortunately, the visual hint of beginning with a
capital letter is only a hint.
|
Code analysis tools such as JSHint and JSLint, when incorporated in your build script, can be configured to emit warnings or errors when you don’t correctly use the community’s capitalization standard. |
To actually execute a constructor function as a constructor, you must
call it with the new operator, such as var x = new FunctionName();.
Take a look at what happens when you call a constructor function without
the new operator:
var x = 100;

function Example(name){
    var self = this;
    self.x = 200;
    self.name = name;

    self.look = function(){
        console.log("%s: x is %d", self.name, self.x);
    };
    return self;
};

var a = new Example('A');
a.look();
var b = Example('B');
b.look();

console.log(a);
console.log(b);
In this example, we’re getting a reference to this and assigning it to self so we can access the cunstructor function instance from within the look method.
If you run the above example using node, you’ll see a lot of output you probably didn’t expect:
A: x is 200
B: x is 200
{ x: 200, name: 'A', look: [Function] }
{ ArrayBuffer: [Function: ArrayBuffer],
  Int8Array: { [Function: Int8Array] BYTES_PER_ELEMENT: 1 },
  Uint8Array: { [Function: Uint8Array] BYTES_PER_ELEMENT: 1 },
  Uint8ClampedArray: { [Function: Uint8ClampedArray] BYTES_PER_ELEMENT: 1 },
  ...
  setTimeout: [Function],
  setInterval: [Function],
  clearTimeout: [Function],
  clearInterval: [Function],
  setImmediate: [Function],
  clearImmediate: [Function],
  console: [Getter],
  x: 200,
  name: 'B',
  look: [Function] }
We’re printing the value of x, then dumping the full structure of each object.
How did object B get all that extra stuff in it? For starters, I’ve
cheated a bit on the last line of the constructor function. If a constructor function doesn’t return a
value, the default behavior is to either return the bound this object.
Using the new operator creates a new this context, while skipping
the new operator causes this to be bound to the global object. That
is, when you call a constructor function without the new operator,
you’re just calling a function within the current execution context. In
the above output, the execution context is the node global space
(sometimes referred to as the global context). Had I skipped line 11,
object A would have worked exactly as it had before but object B
would have been undefined. Some people try to avoid this issue by using
a constructor guard or marking the function itself with 'use strict';.
function Example(){
    if(!(this instanceof Example)) {
        return new Example();
    }
}function Example(name){
'use strict';
this.name = name;
}The problem with the constructor guard is that it can cause issues or
complexities with prototypal inheritance. The 'use strict'; directive
prevents accidentally leaking the internals of your object to the global
scope; the value of this is undefined when the constructor is called
without the new operator.
If you still have questions or concerns regarding constructor functions, read about it further on the Mozilla Developer Network.
2.2. Node.js Basics
In 2008 or 2009, Google began shifting its gears from being an online search and marketing firm to concentrating on a specific goal of ‘making the web faster’. A major part of this initiative was the improvement of web page responsiveness, load times, and traffic reduction. They designed and implemented a protocol called SPDY which is meant to reduce the number of I/O hits a page load incurs on a site. They also contributed to, forked, and rebranded the Chromium browser. In the rebranded Google Chrome browser, Google implemented the v8 JavaScript engine.
Google’s v8 engine is not necessarily unique when compared to other JavaScript engines. For example, Mozilla’s SpiderMonkey JavaScript engine is written in C/C++ and is open source in much the same way as Google’s v8 engine. Google strives for cross-platform feature completeness and is released under a permissive license. Mozilla obviously strives for cross-platform completeness, but finding a single clear licesnse for the SpiderMonkey engine is not exactly easy[6].
|
Microsoft open sourced their newest JavaScript engine-- called Chakra-- in 2016. As of 2017, Chakra appears to be the only other JavaScript engine supported by the Node.js Foundation. You’ll need to manually build or install using a less popular version manager if you want to try it out. |
I can only really hypothesize why Ryan Dahl chose Google’s v8 engine as the basis for creating Node.js. I’m not saying v8 is any better than SpiderMonkey or other JavaScript implementations. It was likely chosen based on personal preference as much as it was related to speed or ease of use as a dependency.
In 2009, Dahl gave an excellent presentation which discussed reasons why we need evented non-blocking I/O and why JavaScript is very well suited for the task. If you can track down the video presentation of Node.js as JsConf 2009, I highly recommend watching that too.
2.2.1. What is Node.js?
Node.js is a server-side JavaScript environment which provides evented asynchronous I/O and a minimalistic set of core features. In the beginning, Node.js combined v8 with libev. Unfortunately, libev is an evented I/O library for Unix-based systems only. Eventually, libev was replaced with a higher-level abstraction library called libuv which allows Node.js to run on Unix-based systems and Windows. In 2011, Microsoft began contributing to Node.js to bring it to the Windows platform. More recently, libuv removed libev as a dependency which helped with bringing Node.js to Windows.
The key concept for Node.js is evented I/O (mostly network-based) operations. This is handled via an event loop. Although understanding the implementation details of event loops can be pretty complicated, the idea is fairly simple. Let’s analogize.
Try to think about an application as a fast food restaurant. A cashier is patiently waiting at the register. A customer walks up to the register and places an order. The cashier hands the order off to the kitchen and maybe fulfills the customer’s drink order before returning to the register. Another customer arrives and places an order, initiating the same scenario as before. A third customer is walking to the register, but just before the customer reaches the register a cook dings a bell and the cashier steps away to grab the first order and hand it to the first customer. The cashier then begins taking the third customer’s order. Midway through the order, the second customer’s order is ready. Because the cashier is not rude (maybe this is in Canada?), the third order must be completed before the second customer’s order can be handed to the second customer. But, the cashier can easily hand over the second customer’s order before filling the third customer’s drink order. Eventually, the third customer’s order is fulfilled and there are no more customers. The cashier waits patiently.
It may sound strange, but the above scenario is a simplification of an event loop. We see things like this every day. New Node.js developers may have a hard time conceptualizing the event loop or understanding where it comes from, so I 'll show a few concrete examples in Node.js. For instance:
function main(){
  console.log("Hello, world!");
}

main();
There’s a little more here than the
obligatory printing of "Hello, world!" I’ve wrapped the output line in
a function called main and subsequently called that function. If you
run this file, you’ll see that it prints out "Hello, world!" and
exits. For our purposes there is no event loop because we haven’t told the runtime to
listen to or emit any events.
There are a couple ways we can initiate an event loop. Possibly the
easiest way to visualize this is to use the standard JavaScript
setInterval function to cause our application to write out "Hello,
world!" every 250ms. To kill this application, you’d need to press
CTRL-C.
function main(){
  console.log("Hello, world!");
}

setInterval(main, 250);
The above example is technically an event loop, thanks to the setInterval function.
Another way to initiate an event loop is to bind to or set up any event
which interacts in some way with a file handle. In Unix, nearly
everything is considered a file, so this would mean binding to a socket,
file descriptor, or event screen input:
// respond to the SIGINT event
process.on('SIGINT', function(){
    process.stdout.write('\nHandling SIGINT event!\n');
    // cleanly exit with non-error status
    process.exit(0);
});

// listen to events on standard input
process.stdin.setEncoding('utf8');
process.stdin.on('data', function(chunk) {
  process.stdout.write('Hello, world!\n');
});

// Start reading from stdin so we don't exit.
process.stdin.resume();
console.log('Type anything and press ENTER...');
In the above example, process.stdin.resume() causes Node.js to
continually monitor the readable standard input stream for data. Binding
a listener to watch for SIGINT does not cause node to create an event
loop on its own. Play around with this last example to get an idea of
how the event loop works. When you’re done, type CTRL+C to exit (this sends SIGINT to the process).
If you’re interested in how libuv creates and
maintains an event loop, there is a free uvbook[7]
available which dives into the internals of libuv.
|
If you can’t |
2.2.2. Low-level
The Node.js library is meant to be very low-level. Rather than a traditional web server with plugins, modules and other froofiness, there are servers specializing in tcp, udp, and http connectivity. Instead of giving you modules for interacting with a variety of file types (PNG, JPEG, etc.), there are readable and writable streams. This can be intimidating. Luckily, the Node.js community produces and shares a large repository of open source modular code, called npm.
The npm project provides Node Packaged Modules and is bundled together with Node.js in recent versions (recent means v0.6.3 or higher).
We won’t go in depth on npm. All you need to know to get started is that
npm handles package management via a package.json file and that you
can install modules locally (within your project) or globally
(accessible to your entire system). If you’ve used other package
managers like bundler, bower, NuGet, or any others, you’ll pick up on
npm quickly.
Facebook maintains another Node.js package manager called yarn. I personally prefer
using yarn because it’s a little faster and does sane things ()like creating a version
lockfile) by default. I don’t cover yarn because it would just be an extra
thing to learn in this book, and it offers marginal value over npm.
Don’t be put-off by the low-level nature of Node.js core libraries. Many of the modules in the npm repository are production-ready and allow you to build applications and modules atop a very customizable software stack.
2.3. Non-blocking I/O
There are two terms I will use interchangeably here: non-blocking I/O
and asynchronous I/O. Conceptually they’re similar, but fundamentally
they’re different. I define non-blocking I/O as any file descriptor based
operation for which a call returns immediately with some identifier to
indicate to the caller that the function has not yet received a value to present to the caller;
it is up to the invoking code base
to continually poll the kernel in some way for the error or result.
Similarly, asynchronous I/O operates without blocking, except instead of
requiring the framework to continually bother the kernel for a response,
a callback function’s memory location is referenced in the invocation so
the kernel can simply write to some memory when it is ready. These descriptions
are at the lowest level of implementation. You can consume non-blocking or asynchronous
calls through the Node.js standard library (e.g. using process.on or setInterval as we’ve seen).
Let’s take I/O implementations out of the picture. The concepts of non-blocking and
asynchronous functions are more similar. A non-blocking function like process.on may
simply bind to an EventListener and we don’t need to understand the internal implementation.
Does it poll and support my earlier definition of non-blocking I/O? What if there’s no I/O?
Does it provide a callback that gets invoked at a later time? In the end,
these things don’t matter much and straddle the line of pedantry. This I why I use
non-blocking and asynchronous interchangeably; in both cases, a function is invoked without
blocking the event queue.
Any time there is a blocking or sycnchronous operation going on, nothing else can occur. Any requests to do other work would have to be queued up in order to be executed when the current synchronous operation is finished. As you can see in the blocking operations diagram, a blocking call is represented by a solid white rectangle (an activation in UML terms). The example illustrates what would happen in code which queries whether or not a file exists before reading the entire file contents into memory.
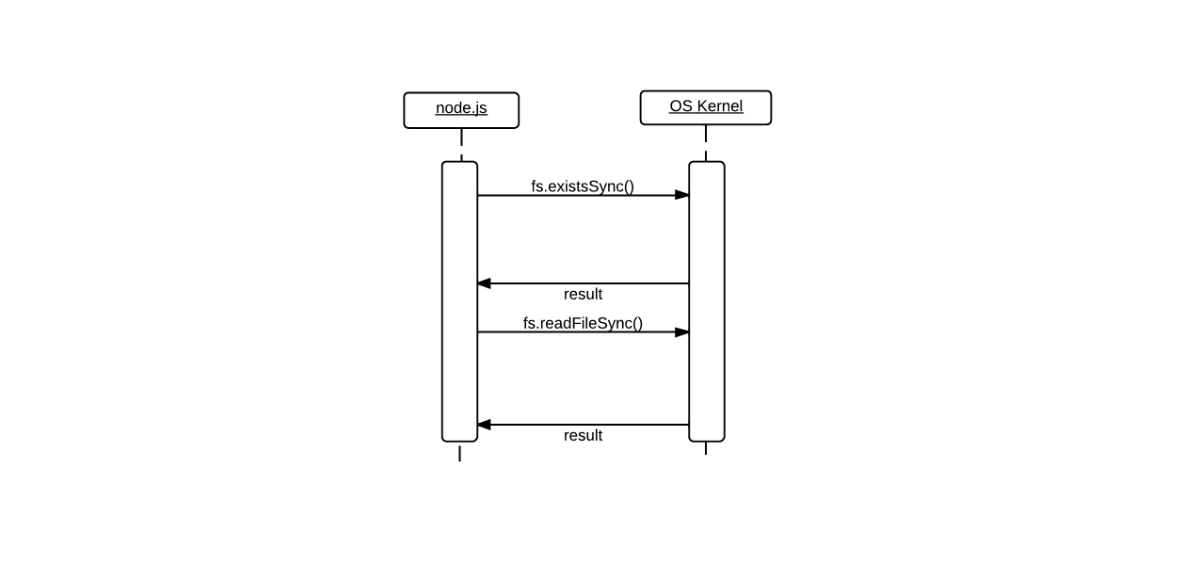
var fs = require('fs'),
    file = '/tmp/example.txt';
if(fs.existsSync(file)) {
    var contents = fs.readFileSync(file, 'utf8');
    console.log(contents);
} else {
    console.log('%s does not exist', file);
}
The non-blocking diagram has broken areas
between the asynchronous calls to fs.exists and fs.readFile. While
the operating system’s kernel performs some work for fs.exists, it’s
possible for some other code (not fs.readFile) directly after this
function call to execute. When the kernel has completed the operation, a
function is invoked inside of which fs.readFile is executed depending
on the result of the fs.exists call.
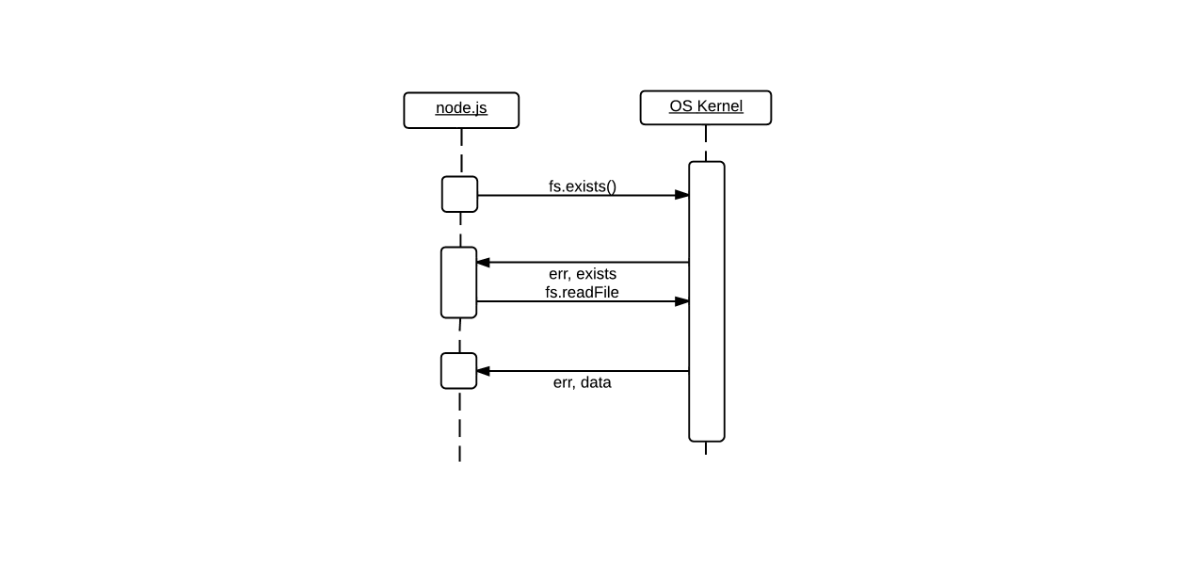
var fs = require('fs'),
    file = '/tmp/example.txt',
    o = { encoding: 'utf8' };

fs.exists(file, function(itExists) {
    if(itExists) {
        fs.readFile(file, o, function(err, data) {
            if(err) {
                console.log(err);
            } else {
                console.log(data);
            }
        });
    } else {
        console.log('%s does not exist', file);
    }
});
You may think the non-blocking example’s code looks a little more complex than the blocking example’s code. This is most likely because of how we’re taught to program. It is ingrained into our collective developer minds to write blocking code[8].
#!/usr/bin/env ruby
puts "What is your name?"
name = gets

puts "Hello #{name.chomp}!"
Does the above snippet look familiar? You may not have initially learned coding in ruby, but the process is the same: show text, get input, show more text. Thinking in this way is inherently easier to comprehend than: create a loop which responds to events, show text, loop?, get input, loop?, show more text only when input is received. Don’t worry. If you’re a little confused now, you’ll just need to practice a bit to get the hang of it.
2.4. Summary
By now you should have a pretty good grasp of the JavaScript basics that I consider a requirement for Node.js development. You should also be comfortable with Node.js as a low-level starting point for non-blocking and evented I/O as a server-side JavaScript environment. Be sure to bookmark the Node.js documentation site (http://nodejs.org/api/).
In the next chapter, we’ll go over the initial concern of any development project: what we plan to build.